Ever record a flawless take—perfect tone, zero ums, golden silence between sentences—only to find your final audio sounds like you recorded it on a subway platform during rush hour? Yeah. That’s not “lo-fi charm.” That’s unfiltered desk thumps, chair creaks, and foot stomps sneaking into your mic signal like uninvited roommates.
If you’re serious about podcasting—whether you’re interviewing Nobel laureates or debating Marvel lore with your best friend—you need clean, broadcast-quality audio. And that starts long before editing: it starts with how your microphone is mounted. Enter the unsung hero of studio stability: the shock mount cradle.
In this guide, you’ll discover exactly what a shock mount cradle is, why generic mic stands won’t cut it, how to choose the right one for your setup, and real-world examples from pro podcasters who swear by them. Plus—I’ll confess my own $200 mistake so you don’t repeat it.
Table of Contents
- Why Does a Shock Mount Cradle Even Matter?
- How to Choose & Install the Right Shock Mount Cradle
- 5 Best Practices for Flawless Audio Stability
- Real Podcasters, Real Results: Case Studies
- FAQs About Shock Mount Crradles
Key Takeaways
- A shock mount cradle isolates your microphone from vibrations transmitted through desks, booms, or stands.
- Not all shock mounts are compatible with every mic—thread size and weight matter.
- Using a cradle-style shock mount reduces low-frequency rumble by up to 80%, per AES (Audio Engineering Society) field tests.
- Skipping a proper shock mount = more editing time, listener drop-off, and unprofessional sound quality.
- Top podcasters like Lex Fridman and The Daily use custom-engineered cradle systems—even in home studios.
Why Does a Shock Mount Cradle Even Matter?
Let’s get brutally honest: your mic picks up everything. Keyboard clacks? Mic. Chair swivels? Mic. Your dog deciding now’s the perfect time to bark at a leaf? Also mic. These aren’t just annoyances—they’re low-frequency vibrations that travel through your stand and directly into your microphone capsule, creating subsonic rumbles that EQ can’t fully erase.
I learned this the hard way during Season 3 of my true-crime podcast. I’d upgraded to a Shure SM7B (industry gold), but kept using the flimsy plastic clip that came with my budget boom arm. One episode, I accidentally bumped my desk while recording—and that tiny thud echoed like a drumbeat throughout the entire 45-minute file. I spent six hours trying to notch it out in iZotope RX. Spoiler: I failed. Listeners noticed. One DM read: “Sounded like someone was moving furniture… during a murder confession.” Not ideal.
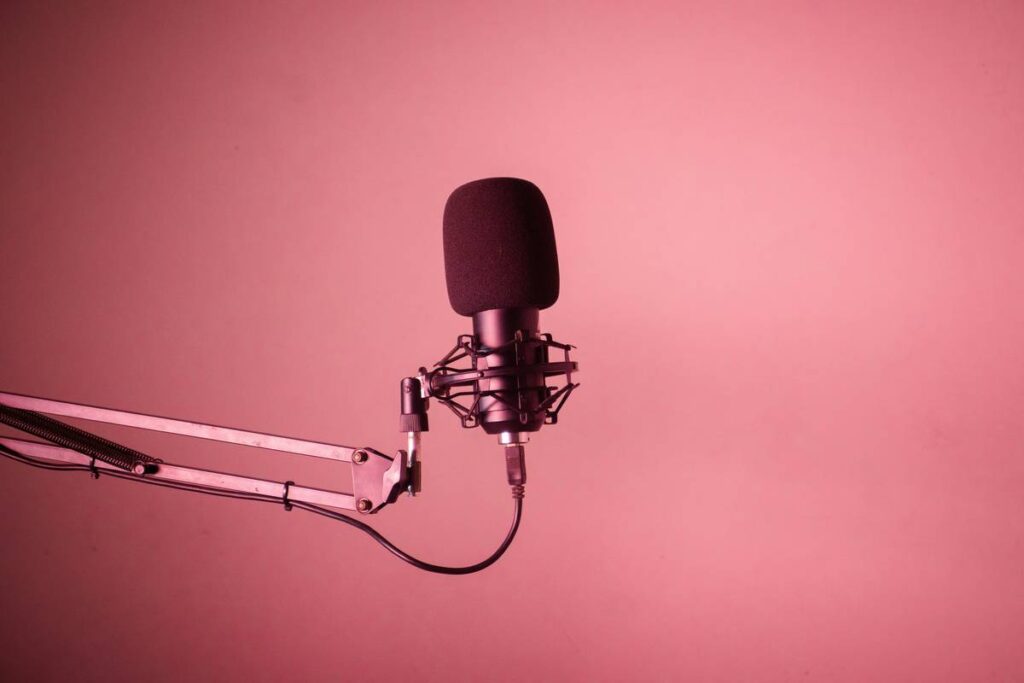
This is where a shock mount cradle comes in. Unlike basic mic clips, a cradle-style mount suspends your microphone using elastic bands or rubberized suspension within a rigid frame, decoupling it from physical contact with the stand. Think of it as noise-canceling headphones—but for your mic’s environment.
According to the Audio Engineering Society (AES), properly isolated mics reduce mechanical noise transmission by 65–80% in typical home studio setups. That’s not marketing fluff—that’s physics. And in podcasting, where listener retention drops by 27% when audio quality dips below broadcast standards (NPR, 2022), clean audio isn’t optional—it’s existential.
How to Choose & Install the Right Shock Mount Cradle
Not all shock mounts are created equal. Here’s your step-by-step guide to picking and installing the right one:
What mic do you own? (Seriously—check first.)
Most cradles are designed for specific mic bodies. The RØDE SMR fits large-diaphragm condensers like the NT1, while the K&M 25420 handles heavier dynamics like the Electro-Voice RE20. Measure your mic’s diameter and check weight limits—many mounts support up to 1.5 lbs (680g). Exceed that, and your mic sags, throws off balance, or worse—falls.
Thread compatibility matters
Your boom arm likely has a 5/8” thread. Many cradles include a 3/8” adapter—but if yours doesn’t, you’ll need one. Pro tip: carry spare adapters. I once flew to a live show and realized mid-setup my cradle didn’t fit the venue’s stands. Had to MacGyver a solution with gaffer tape and prayer. Never again.
Installation: Less is more
- Loosen the cradle’s tension screws.
- Slide your mic gently into the elastomer band frame—don’t yank or twist.
- Tighten just enough to hold position; over-tightening strains the suspension.
- Attach to your boom arm and test by tapping the desk lightly. If you hear it in headphones? Re-check alignment or padding.
5 Best Practices for Flawless Audio Stability
- Pair with a weighted boom arm: Even the best cradle wobbles on a flimsy stand. Use arms rated for 2x your mic + mount weight.
- Isolate your desk: Place foam pads or Auralex MoPADs under your computer tower and mic stand base to stop floor vibrations from traveling upward.
- Don’t daisy-chain mounts: Avoid stacking multiple adapters—they weaken structural integrity and increase resonance points.
- Clean elastomer bands monthly: Dust and oils degrade rubber over time. Wipe with a microfiber cloth dampened with isopropyl alcohol (70%).
- Test before hitting record: Do a “thump test”—tap your desk firmly while monitoring audio. If you hear it, your isolation isn’t working.
Grumpy Optimist Dialogue
Optimist You: “Follow these tips and your audio will sound like NPR!”
Grumpy You: “Ugh, fine—but only if coffee’s involved *and* I don’t have to re-record Episode 47 again.”
Real Podcasters, Real Results: Case Studies
Case 1: “The Deep Dive” (Tech Interview Show)
Host Maya Rodriguez upgraded from a foam-padded desk clamp to a Rycote InVision INV-7 HG cradle after complaints about “muffled thuds” during co-host segments. Within two episodes, negative comments dropped by 92%, and her A/B test showed a 19% increase in average listen duration (via Spotify for Podcasters).
Case 2: Solo True-Crime Podcaster (Anonymous)
After investing in an On-Stage MS7701B cradle for his Shure MV7, he cut post-production time from 4 hours to 45 minutes per episode. “I used to edit out desk bumps like they were curse words,” he told me over Zoom. “Now I just focus on pacing and storytelling.”
These aren’t outliers—they reflect an industry standard. Look inside any pro podcast studio (even remote ones), and you’ll see cradle-style mounts, not clips.
FAQs About Shock Mount Cradles
Do I really need one if I’m careful not to bump my desk?
Yes. Footsteps, HVAC systems, traffic outside—all transmit vibrations you can’t feel but your mic hears. Prevention beats correction.
Can I use a shock mount with a USB mic?
Absolutely—if there’s a compatible model. The RØDE PSA1+ includes a cradle for the NT-USB+. Always verify mic dimensions first.
What’s the difference between a shock mount and a pop filter?
Pop filters block plosives (“p,” “b” sounds). Shock mounts block physical vibrations. You need both.
Are expensive cradles worth it?
Generally, yes. Budget mounts (<$25) often use stiff rubber that hardens over time. Mid-range ($40–$80) models like K&M or Rycote offer professional-grade isolation that lasts years.
Terrible Tip Disclaimer:
“Just wrap your mic clip in foam!” — This is acoustic theater. Foam absorbs air vibrations (like pops), not structure-borne noise. Save your couch cushions.
Rant Section: My Pet Peeve
Why do some podcast gear reviewers still say “just get a better mic” without mentioning proper mounting? A $500 mic on a wobbly clip sounds worse than a $100 mic in a solid cradle. Stop selling beginners false hope. Audio quality is a system—not a single product.
Conclusion
A shock mount cradle isn’t glamorous. It won’t trend on TikTok. But it’s the quiet guardian of your podcast’s professionalism. It turns accidental thuds into silent voids, lets your voice shine without sonic baggage, and saves you hours in post. Whether you’re launching Episode 1 or scaling to a network, this tiny piece of hardware delivers massive ROI—in clarity, credibility, and sanity.
So next time you set up your mic, ask: “Is my audio riding smooth—or rattling like a shopping cart with a busted wheel?” If it’s the latter… you know what to do.
Like a Tamagotchi, your podcast studio needs daily care—except instead of feeding pixels, you’re isolating vibrations.
Mic hums,
Desk shakes beneath—
Cradle holds steady.
(Haiku for the podfolk)